
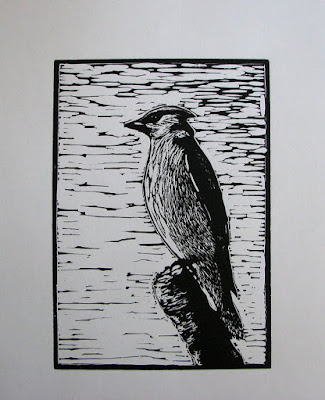
In continuing with a bird theme I decided to do a study from a photo I took last year of a cedar waxwing perched on top of a dead birch tree stump.


Then it was time to roll ink across and take a test proof to determine how much more I still need to cut away. It is hard to tell in the background sky what lines will show up until ink is rolled across the surface. Here is the resulting proof produced on bond paper with w/s ink.
I think the sky is a little busy for my taste so will remove more line (but leave a hint here and there just to add a little interest.) Adding colour into the print will also give it a whole new dimension so may do a marker or watercolour rough mockup first from which I can decide how things will work.
I put the photo in front of me and then by eye sketched freehand right onto a piece of gray battleship linoleum that was first coated in black ink from a broad tip waterproof Sharpie marker. The sketch was made on the black using a silver ink extra fine point gel marker. It dries quickly and won't smudge when the lines are dry. The contrast is great and allows me to use the lighter line as my cutting guide.
For this study my plan is to leave a thin line in the keyblock that will be around the print. I also want to add colour so may cut and print several more blocks or I may just apply hand colouring, haven't really decided yet.
I cut away at the block with a variety of gouge shapes but mostly a large U shape gouge for the broad areas that will define the sky. I then carefully added fine line detail in the bird using a wood engraving spitsticker tool.
Then it was time to roll ink across and take a test proof to determine how much more I still need to cut away. It is hard to tell in the background sky what lines will show up until ink is rolled across the surface. Here is the resulting proof produced on bond paper with w/s ink.
I think the sky is a little busy for my taste so will remove more line (but leave a hint here and there just to add a little interest.) Adding colour into the print will also give it a whole new dimension so may do a marker or watercolour rough mockup first from which I can decide how things will work.
This is fantastic. Inspiring me to get back to work on my blocks.
ReplyDelete